
Quick Answer: To increase mouse speed in Windows 11, go to Settings → Bluetooth & devices → Mouse and drag the Mouse pointer speed slider to the right. On Windows 10, go to Settings → Devices → Mouse and adjust the Cursor speed slider. Changes apply instantly — no restart needed.
A slow or sluggish cursor makes everything on your PC feel harder — dragging files, browsing, and especially gaming. The good news: Windows lets you change your mouse speed in under a minute, and you don’t need any extra software to do it.
In this guide, we’ll show you the exact steps for both Windows 11 and Windows 10, how to fine-tune your mouse DPI, and the acceleration setting most gamers turn off for better aim. Once you’ve dialed in your settings, you can test the difference on our mouse test tool.
How to Change Mouse Speed in Windows 11
Windows 11 gives you two ways to adjust your mouse speed. The Settings method is the fastest and works for most people; the Mouse Properties method gives you slightly finer control and unlocks a few extra options.
Method 1 – Using Settings (Fastest Way)
- Press Windows + I to open Settings.
- Select Bluetooth & devices from the left sidebar.
- Click Mouse.
- Under Mouse pointer speed, drag the slider to the right to increase speed, or to the left to decrease it.
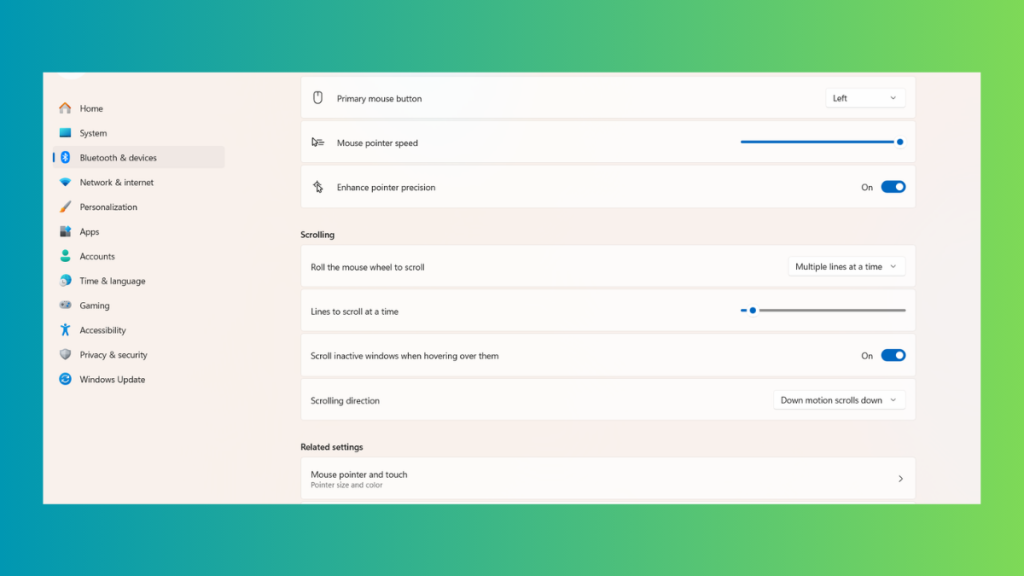
The change applies instantly — move your cursor around as you drag the slider until it feels right. There’s no need to restart and no “save” button; Windows remembers your settings automatically.
Tip: Start at the middle position and increase one notch at a time. Jumping straight to maximum usually makes the cursor feel twitchy and harder to control, especially on high-resolution monitors.
Method 2 – Using Mouse Properties (More Control)
- Open Settings → Bluetooth & devices → Mouse as above.
- Scroll down and click Additional mouse settings. This opens the classic Mouse Properties window.
- Go to the Pointer Options tab.
- Under Motion, drag the Select a pointer speed slider toward Fast.
- Click Apply, test the speed, then click OK.
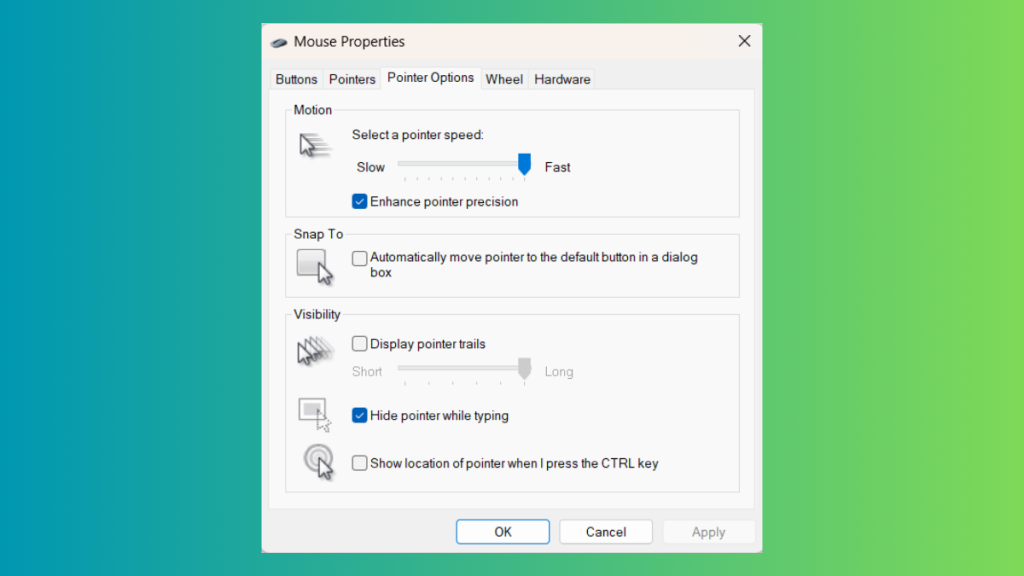
This is the same slider you’ll find in Windows 10’s Control Panel, so if you’ve used older versions of Windows, it will look familiar. You’ll also see the Enhance pointer precision checkbox here — leave it alone for now, because we cover exactly what it does (and why gamers turn it off) [later in this guide → jump link to acceleration section].
How to Change Mouse Speed in Windows 10
The steps in Windows 10 are almost identical — only the Settings menu layout is different.
Method 1 – Using Settings
- Press Windows + I to open Settings.
- Click Devices.
- Select Mouse from the left sidebar.
- Under Cursor speed, drag the slider to the right to speed up your mouse.
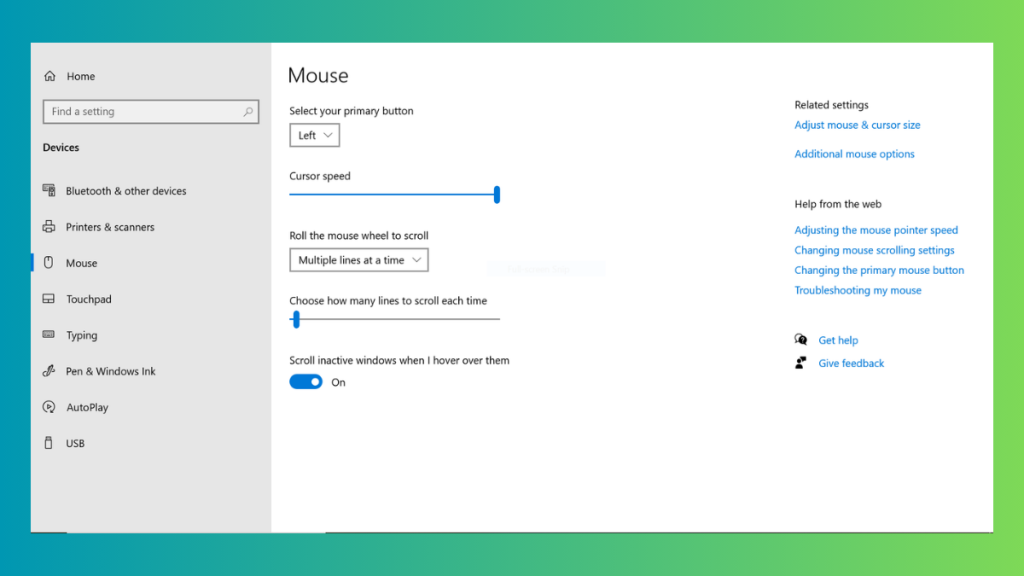
Just like Windows 11, the change applies in real time — no restart, no save button.
Method 2 – Using Control Panel (Mouse Properties)
- Type Control Panel in the Start menu search and open it.
- Go to Hardware and Sound → Devices and Printers → Mouse.
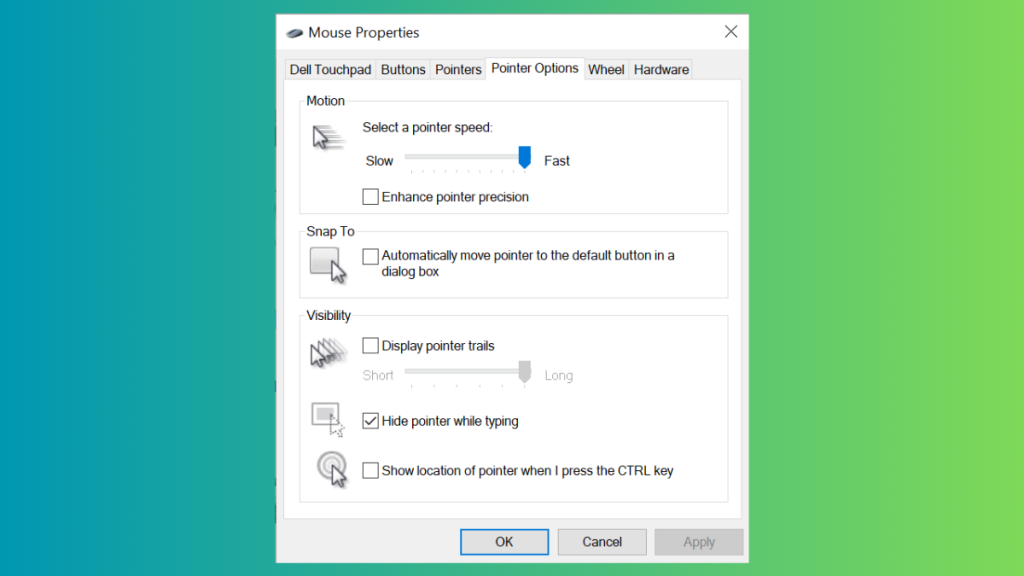
- In the Mouse Properties window, open the Pointer Options tab.
- Drag the Select a pointer speed slider toward Fast.
- Click Apply, test the movement, then OK.
(Screenshot: Windows 10 Control Panel path + Mouse Properties window)
Note: Windows 10 reached end of support in October 2025, which means it no longer receives security updates from Microsoft. These mouse settings still work the same — but if you’re planning to stay on Windows 10, make sure you’re aware of the [security implications]. If you’ve upgraded, use the Windows 11 steps above.
Turn Off Mouse Acceleration (Enhance Pointer Precision)
Mouse acceleration – called Enhance Pointer Precision in Windows. Changes how far your cursor travels based on how fast you move your mouse, not just how far. Move your mouse quickly, and the cursor jumps further; move it slowly, and it travels less, even if the physical distance is identical.
For everyday desktop use, this is fine. For gaming, it’s a problem: your aim depends on muscle memory, and muscle memory needs the same hand movement to produce the same cursor movement every single time. With acceleration on, that consistency is impossible – which is why almost every competitive FPS player turns it off.
How to turn it off (Windows 11 and 10):
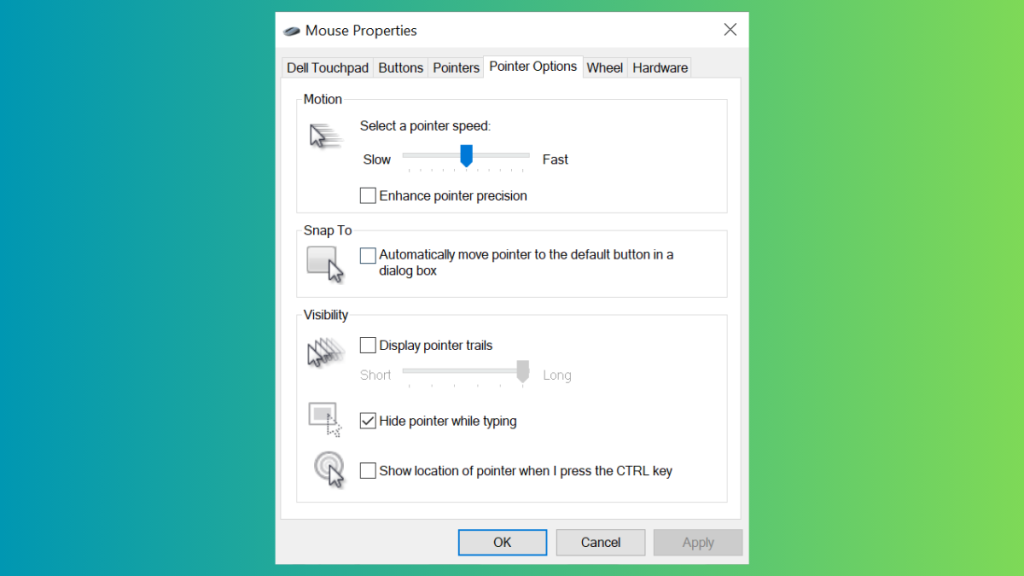
- Open the Mouse Properties window (see Method 2 in either section above).
- Go to the Pointer Options tab.
- Untick Enhance pointer precision.
- Click Apply, then OK.
When should you leave it ON?
Acceleration isn’t always the enemy. Keep it enabled if:
- You’re using a laptop touchpad – small surface areas benefit from speed-based movement.
- You mostly do office work or browsing – acceleration lets you cross a large monitor with a small flick, then slow down for precise clicks.
- You have limited desk space and can’t make wide arm movements.
The rule of thumb: precision tasks (gaming, design work) → off. Convenience tasks (browsing, documents) → on.
After changing this setting, your mouse will feel strange for a day or two — that’s normal. Your muscle memory is recalibrating. Give it a week before deciding whether to switch back, and use our [Mouse Test] to feel the difference in raw cursor tracking.
Adjust Your Mouse DPI
DPI (Dots Per Inch) measures your mouse’s hardware sensitivity – how far the cursor moves on screen for every inch you move the mouse. At 1000 DPI, moving your mouse one inch moves the cursor 1000 pixels. Higher DPI = faster cursor for the same physical movement.
Here’s the key difference from the Windows slider: the pointer speed slider is a software adjustment, while DPI is your mouse’s hardware setting. When both are fighting each other — high DPI plus high slider speed — your cursor can skip pixels and feel jittery. The cleanest setup for smooth cursor control is a moderate DPI plus the Windows slider at the default (middle) position, so the hardware does the work.
Not sure what your current DPI actually is? Most mice don’t display it anywhere. Use our [Mouse DPI Analyzer] to measure your real DPI in a few seconds, no software installation needed. Knowing your baseline number makes everything below much easier to apply.
Recommended DPI by use case:
| Use Case | Suggested DPI Range |
| Office work & browsing | 800 – 1200 |
| FPS games (CS2, Valorant) | 400 – 800 |
| MOBA / RTS games | 800 – 1600 |
| 4K / high-resolution monitors | 1600 – 3200 |
| Photo editing & design | 400 – 800 |
These are starting points, not rules. Pro FPS players sit at low DPI because large, deliberate arm movements are more consistent for aiming than small wrist flicks.
How to change your DPI:
- Gaming mice: Most have a dedicated DPI button (usually below the scroll wheel) that cycles through preset levels. For exact values, use your manufacturer’s software — Razer Synapse, Logitech G HUB, SteelSeries GG, or Glorious Core.
- Standard mice: Fixed DPI with no adjustment — your only option is the Windows pointer speed slider covered above. If you want real DPI control, that’s the main reason to upgrade to a [gaming mouse](link to gaming mouse guide once new slug is live).
After changing DPI, re-run the [Mouse DPI Analyzer] to confirm the setting actually applied — some budget mice advertise DPI levels their sensors don’t accurately deliver.
Change Touchpad Speed on Laptops
If you’re on a laptop without an external mouse, your cursor speed is controlled by the touchpad settings, and both Windows versions now have a dedicated slider for it. No registry editing needed (older guides still recommend this – ignore them).
Windows 11:
- Press Windows + I to open Settings.
- Go to Bluetooth & devices → Touchpad.
- Under Cursor speed, drag the slider to your preferred speed.
Windows 10:
- Open Settings → Devices → Touchpad.
- Adjust the Change the cursor speed slider.
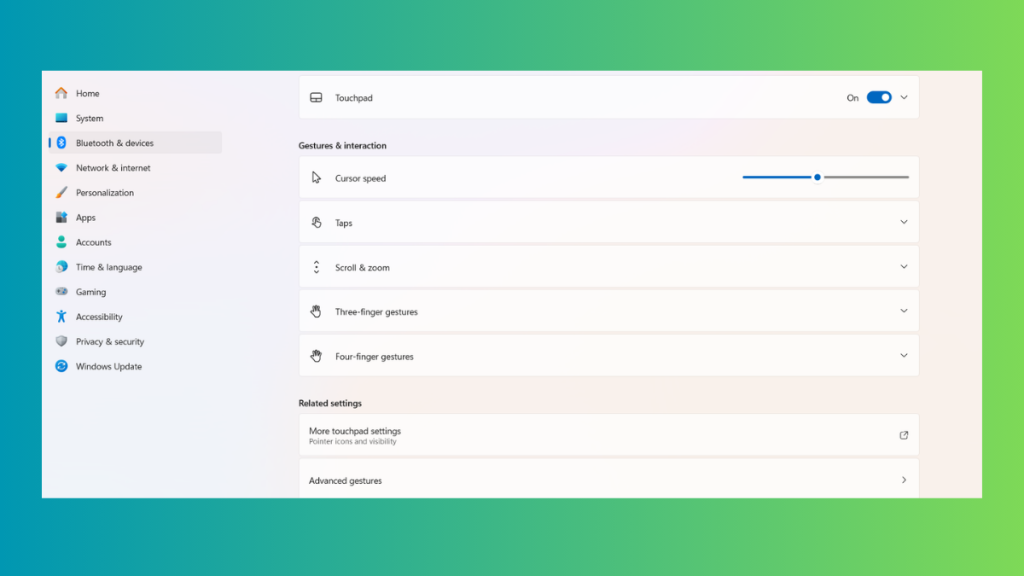
Note that the touchpad slider is separate from the mouse pointer slider — if you use both a touchpad and an external mouse, each keeps its own speed setting, so adjusting one won’t affect the other.
Tip: If your touchpad feels laggy even at high speed, check Touchpad sensitivity on the same settings page — low sensitivity adds a delay before the touchpad responds after typing, which people often mistake for a slow cursor.
Adjust Double-Click Speed
Windows also lets you control how fast two clicks must be to register as a double-click. If your double-clicks sometimes register as two single clicks, this setting is usually the culprit.
- Open the Mouse Properties window (see Method 2 above).
- Go to the Buttons tab.
- Under Double-click speed, drag the slider — Slow gives you more time between clicks, Fast requires quicker clicking.
- Double-click the folder icon next to the slider to test it, then click Apply.
(Screenshot: Buttons tab with the slider and test folder highlighted)
Once you’ve set it, put your clicking speed to the test — our CPS Test measures how many clicks you can land per second, and it’s the quickest way to feel whether your new mouse settings actually made you faster.
Advanced: Change Mouse Speed via Registry
For most people, the Settings slider is all you need — this method exists for power users who want values beyond what the slider offers, or who manage settings across multiple machines.
⚠️ Before you start: Editing the registry incorrectly can cause system problems. Back it up first — in the Registry Editor, go to File → Export, save a copy, and you can restore it anytime with File → Import. Skip this section entirely if you’re not comfortable in the registry; the Settings slider does the same job safely.
Steps:
- Press Windows + R, type regedit, and hit Enter.
- Navigate to: HKEY_CURRENT_USER\Control Panel\Mouse
- Double-click MouseSensitivity and set a value between 1 and 20 — the default is 10, which matches the middle position of the Settings slider. Higher = faster cursor.
- To disable mouse acceleration from here too, set MouseSpeed, MouseThreshold1, and MouseThreshold2 all to 0.
- Close Registry Editor and sign out and back in (or restart) for the changes to apply.
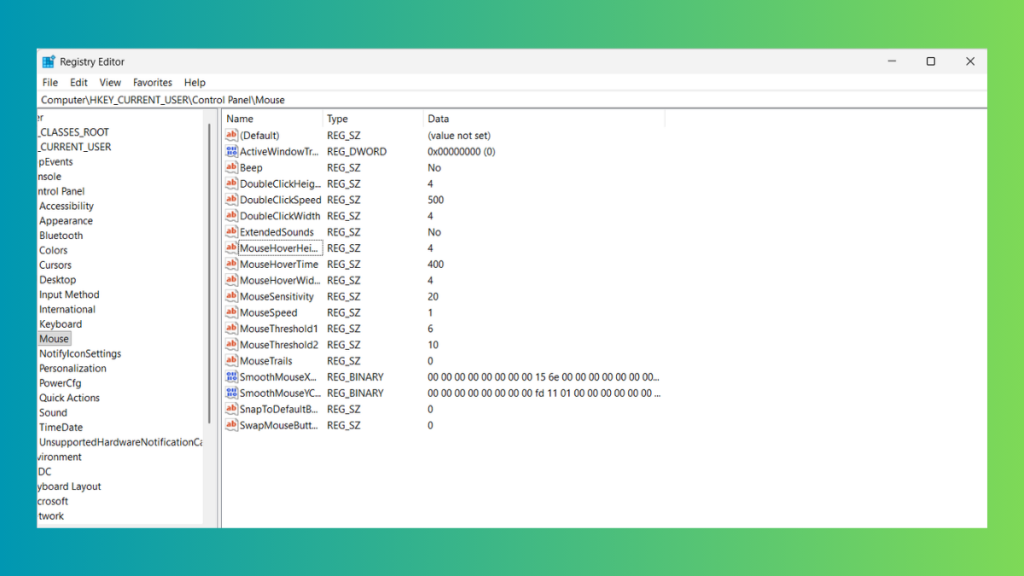
What these values actually do: MouseSensitivity is the same setting as the pointer speed slider – 1 to 20 maps directly onto the slider’s positions. MouseSpeed and the two Threshold values control acceleration: when MouseSpeed is 1 or 2, Windows doubles or quadruples cursor movement once your mouse crosses the Threshold speed. Setting all three to 0 switches acceleration off completely — the registry equivalent of unticking Enhance pointer precision.
FAQs
Why Is My Mouse Suddenly Slow In Windows 11?
The most common causes are a low battery (wireless mice slow down or stutter before dying), a dirty sensor, or a Windows update resetting your pointer speed. Check the slider in Settings → Bluetooth & devices → Mouse first, then clean the sensor and swap the surface you’re mousing on before assuming it’s a software problem.
What Is The Best Pointer Speed Setting?
The middle position (6/11 in Windows terms) is the sweet spot for most people. It’s the only slider position where Windows doesn’t skip or duplicate pixels. If you need a faster cursor, raising your mouse DPI gives smoother results than pushing the slider right.
Is A Higher DPI Always Better?
No. Beyond your comfort range, higher DPI just makes the cursor harder to control. That’s why pro FPS players use 400–800 DPI, far below what modern sensors support. Match DPI to your task using the table above, not to the biggest number on the box.
Does Polling Rate Affect Mouse Speed?
No. Polling rate (measured in Hz) is how often your mouse reports its position to your PC. It affects smoothness and input delay, not how far your cursor travels. 1000Hz is plenty for most players; higher rates give diminishing returns.
How Do I Change Mouse Speed Without A Mouse?
Press Windows + I to open Settings, then use Tab, the arrow keys, and Enter to navigate to the mouse settings and adjust the slider. If your mouse is completely dead, you can also enable Mouse Keys (Settings → Accessibility → Mouse) to control the cursor with your numeric keypad.
How Do I Set Up My Mouse For Left-handed Use?
Go to Settings → Bluetooth & devices → Mouse and switch Primary mouse button to Right. That’s the whole process — your pointer speed settings stay the same either way.
Conclusion
The right mouse speed is whatever lets you point exactly where you intend without thinking about it – for most people that’s the Windows slider at default with DPI doing the heavy lifting, and acceleration off if you game.
Change one setting at a time, live with it for a few sessions, and resist the urge to tweak everything at once. When you’re done, run our [Mouse Test] to confirm everything is tracking cleanly — and if you want to see what your new settings do for your speed, the CPS Test is waiting.